Scheduled Issues for Jira
This blog entry is in English since it may be of broader interest.
Jira is a very flexible and powerful issue tracking system. fence IT uses Jira to support a variety of processes.
Scheduling…?
What does scheduling in this context mean? Sometimes issues are known well ahead of time, but work may not start before a certain date. A good example are annual licenses, that are usually renewed only a few days or weeks in advance. Already creating an issue a year in advance will lead to:
- Having lots of issues assigned, which can’t be worked on.
- Wasting time regularly browsing through your assigned issues.
- Getting used to these issues, that you will take care later.
- Forgetting to finally work on them when they are due.
Possible Solutions
The Scheduler is a Jira plugin, which offers this functionality. It also offers additional possibilities like recurring issues. However, only an administrator may configure such issues. The Scheduler was not a good choice for us, since it was too complex and did not allow normal users to schedule an issue for later resolution.
The fence IT Approach
We chose a different approach, which needs some more work to setup (than just installing a plugin), but was finally a better solution for us. It consists of the following steps, that will be described in more detail afterwards.
- Install the following Jira plugins:
- Setup a new user called “Sleeper”.
- Create new custom fields “Activation Assignee” and “Activation Date”.
- Create a new screen, used when sending an issue sleeping.
- Extend all workflows, which should allow issue scheduling with an additional state (we called this state “Sleeping”) and transitions (“Sleep” and “Activate”).
- Create a filter to show all sleeping issues.
- Configure Jira to allow for the execution of Jelly scripts.
- Install a Jelly script to periodically check for sleeping issues to activate.
Configuration
Step 1 – Install Plugins
The following Jira plugins are required:
- “JIRA Suite Utilities plugin”
This plugin provides additional conditions, validators and post functions to personalize workflows of JIRA. - “Script Runner”
This plugin provides administrators a panel similar to the Jelly Runner, except it will interpret a script to be run on the server. It also allows admins to quickly write functionality to support their business processes in their workflow, without the hassle of writing a fully-fledged plugin.
Install both using the plugin manager of Jira.
Step 2 – New User
Create a new user called “Sleeper”, username “sleeper”. The user should be member of the group “jira-users”, and thus be allowed to login.
In the permission scheme used in the project, add the following permissions to the new user “Sleeper”:
- Browse Projects
- Assign Issues
- Assignable User
- Add Comments
Step 3 – New Custom Fields
- Create a new custom field (Administration -> Issues -> Fields: Add Custom Field)
- Use field type “User Picker”
- Enter field name “Activation Assignee”
- Enter description: “User assigned to activated issue.”
- Choose applicable issue types and projects according to your needs.
- Create a new custom field (Administration -> Issues -> Fields: Add Custom Field)
- Use field type “Date Picker”
- Enter field name “Activation Date”
- Enter description: “Activation date for issue.”
- Choose applicable issue types and projects as above.
Step 4 – New Screen
- Create a new screen (Administration -> Issues -> Screens: Add Screen)
- Enter screen name “Sleeper”
- Enter description “Screen to enter values to send an issue sleeping for later activation:”
- Add the fields “Activation Assignee” and “Activation Date” to the screen.
Step 5 – Adopt Workflow
- Select the workflow to adopt and enter Edit mode (Administration -> Issues -> Workflows)
- Create a new Status
- Enter status name: “Sleeping”
- Enter description: “Status for issues waiting to be activated”.
- Select or upload an image as you like.
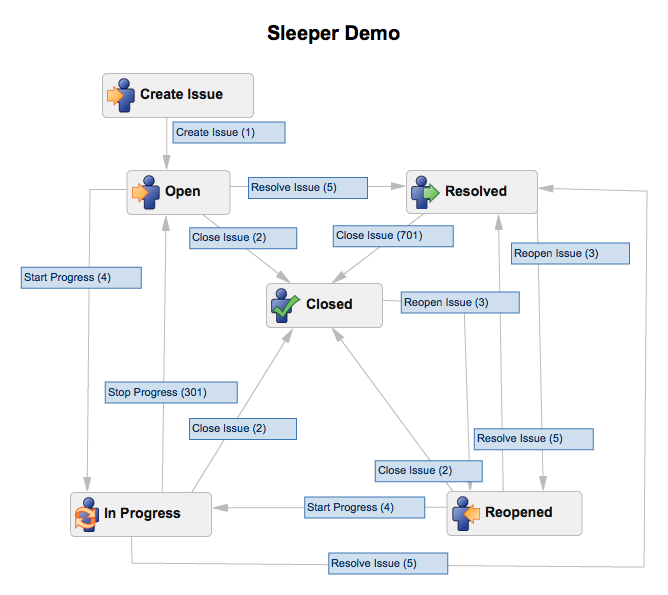
For this tutorial, we use a copy of the Jira default workflow:
- Add the newly created status to the workflow.
- Add a transition from state “Open” (or any other as your workflow requires) to state “Sleeping”
- Enter name: “Sleep”.
- Enter description: “Send issue sleeping until activation is due”.
- Assign previously defined screen “Sleeper” as transition view.
- Add a new validator to the transition “Sleep” by opening the transition configuration menu
- Select “View Validators”, then “Add a new validator”
- Select “Fields required”, then press “Add”
- Select the fields “Activation Assignee” and “Activation Date” and add them to the required fields.
- Add a new post function to the transition “Sleep”
- Select “View Post Functions”, then “Add new post function”
- Select “Update Issue Field”, then press “Add”
- Select the “Assignee” issue field and assign the field value “Sleeper” (user created in step 2)
- Add a transition from state “Sleeping” to state “Open”
- Enter name: “Activate”.
- Leave transition view empty.
- Add a new post function to the transition “Activate”
- Select “View Post Functions”, then “Add new post function”
- Select “Copy Value From Other Field”, then press “Add”
- Select the “Activation Assignee” as source field and “Assignee” as destination field.
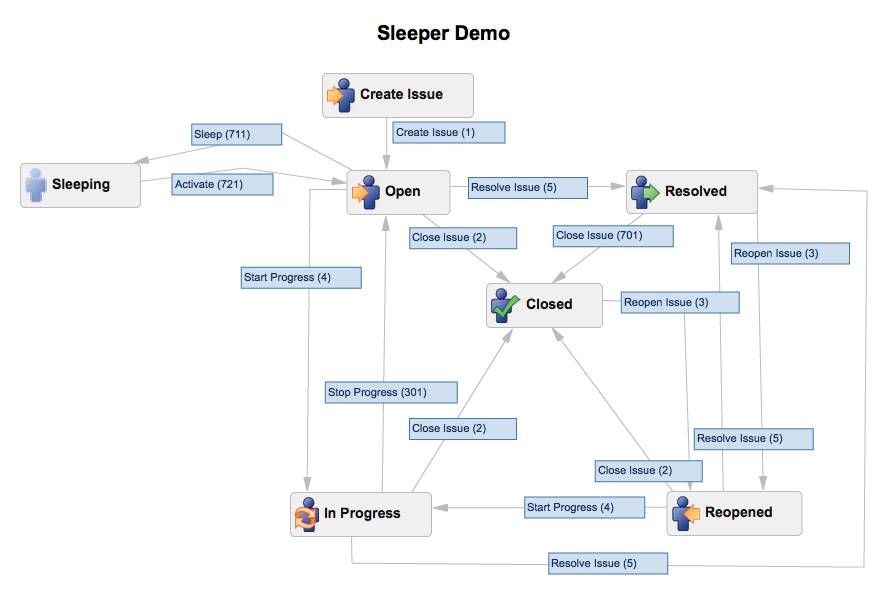
The workflow now look as follows:
Save and activate the workflow.
Step 6 – Create Filter
Create a filter called “Sleeper Agents” and enter the following query: “assignee = sleeper AND AwakeDate <= now()”. Remember the filter id (i.e. from the URL)
Step 7 – Configure Jira
Jelly scripts are by default disabled, but are needed in order to run the script in the next step. Please configure Jira as described in https://confluence.atlassian.com/display/JIRA/Jelly+Tags.
Step 8 – Install Script
In the home directory of Jira, create the following directories:
- <HOME>/jelly
- <HOME>/jelly/scripts
- <HOME>/jelly/output
Store the following script under <HOME>/jelly/scripts/SleepAgentWaker.xml
<JiraJelly xmlns:jira="jelly:com.atlassian.jira.jelly.enterprise.JiraTagLib" xmlns:core="jelly:core">
  <jira:Login username="sleeper" password="put-your-password-here">
    <jira:RunSearchRequest filterid="11405" var="issues" size-var="issuecount"/>
    <core:forEach var="issue" items="${issues}">
      <jira:TransitionWorkflow key="${issue.key}" user="sleeper" workflowAction="Activate"
                               comment="jelly script: waking up sleeper, about time to start working!" />
    </core:forEach>
  </jira:Login>
</JiraJelly>
You need to make the following adoptions:
- on the second line, insert the password for the sleeper user;
- on the third line, adopt the filter id (see step 6);
- on line seven, you might want to change the comment.
Make sure, the script may only be read by the user which runs Jira on your system and nobody else, since there is a plain text password in this script. The same applies by the way for the file “dbconfig.xml”, where the plain text password for the database is stored.
Finally, you need to activate the script from Jira administration (Administration -> System -> Advanced: Services). At the bottom of the page (section “Add Service”) enter the following data:
- Name: “Wake up Sleeper Agents”
- Class: “com.atlassian.jira.jelly.service.JellyService”
- Delay: “60” (Check once every hour)
Press “Add Service”; on the next screen, enter the following data (replace <HOME> by your Jira home path):
- Input File: <HOME>/jelly/scripts/SleepAgentWaker.xml
- Output File: <HOME>/jelly/output/SleepAgentWaker.out
Final Remarks
I wrote this tutorial after having implemented Sleepers in our installation of Jira. I did not test this tutorial, so although I tried my best to put all bits and pieces together, some configuration might have slipped. Please drop me a comment, if you encounter problems and I will fix the tutorial.
This tutorial is based on a locally hosted Jira, using Jira version 5.2.4. Plugins used are Script Runner 2.1.3 and JIRA Suite Utilities 1.3.5.
Please find our contact details on page https://blog.fenceit.ch/impressum/